Sunday, November 2, 2014

Autumn decor by little fingers


Autumn is officially here and it's time to make the house look warm and cozy with the colors of the season. I love to decorate with original art by my son so a new project begins! 

What you will need:
  • A picture of a tree with bare branches
  • 12x12 fall themed paper
  • Tape
  • 5 Autumn inspired colors of finger paint
  • Disposable plate


Step 1:
Print out or draw a tree with bare branches on a sheet of paper. I decided to go the quick way and print out a few from my computer's clip art. Tape the sheet down in front of your artist so it doesn't slip away from them. 

Step 2:
Grab a disposable paper plate and put five dots of color on it as shown in the picture above. You won't need much of each color, about a dime size of each will do. 

Step 3: 
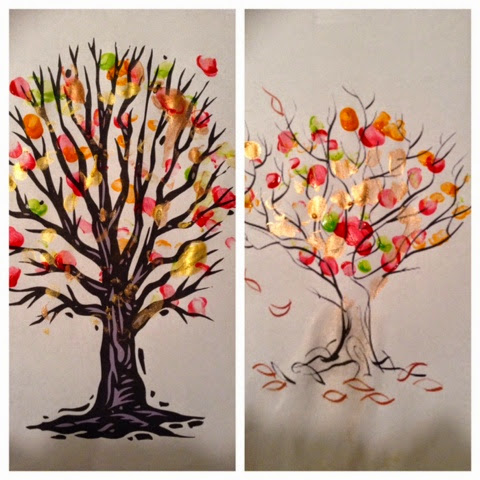
Have your artist take their pointer finger and dip it into one color. Place dots of color around the bare branches of the tree. Wipe their finger clean and repeat with each color. When they finish it should look similar to the pictures below.


Step 4:
After your tree dries add a little more flare by taping the picture to a large sheet of Autumn themed paper (12x12). Once completed your master piece is ready to hang in a place of honor. I hope you have as much fun as we did! 


Saturday, October 18, 2014

Ghostly Feet and Witchy Hands

In the spirit of Halloween lets do something fun that the kids can hang around the house. Today we're going to make ghosts and witches with our hands and feet. Here's what you'll need.


  • A Yellow & black sheet of craft paper
  • White and Green paint (if your little one doesn't like to get their hands dirty use a white & green crayon)
  • Black & orange markers
  • Sticker eyes
  • Halloween stickers
  • Candy corn to nibble on while you work. ;)


Step 1: Ghostly feet
Grab your black sheet of construction paper and white paint. Sit your child down and cover the bottoms of their feet with paint and press onto the paper creating ghosts. If you prefer to go the less messy route then use a white crayon to outline both feet then shade in your ghost. 


Step 2: Decorating your ghosts. (After the paint dries)
Grab your stickers and let your little one decorate their ghosts. We ran by our local dollar store and found jiggly eyes and Halloween stickers for decorating. 


Step 3: Making your witch.
Grab your green paint and use it to make your child's green handprint in the middle of the page. If you want to go less messy then trace their hand in green with your crayon and shade it in when finished. After the hand is complete draw a broom for the witch using your black marker. Then take your orange marker and ask you little one to give her hair. I did a few to show my three year old what we were going for, then he did the rest. 


Step 4: Making the witch look witchy. (After the paint dries)
Grab you jiggly eyes and stickers and let your kids use their imagination to decorate. My son had the best time giving her scary teeth and big eyes! 


I hope you and your little ghouls enjoyed our little project. Max's work hangs over the art table to add to our Halloween decor. He loves to show everyone his creations! 


Tuesday, September 30, 2014

Pinecone Sparkles

Pinecone Sparkles

This weeks post will be a quick pinecone craft that will add a sparkle to your fall decor. 

You will need:
-Pinecones
-Elmer's glue
-Plastic zip bags 
-Glitter
-Disposable tray
-Old paint brush
-Mod Podge clear acrylic sealer (optional)
-Hot glue gun and glue sticks (optional)
-Ribbon (optional)


Step one: 
Before you can start decorating your pinecones it is important to bake the bugs out. Place your pinecones on a foil lined cookie sheet and bake in a 200 degree oven for 20-30 minutes. Make sure to keep a close eye on them because they can burn. When your cook time is up set you pinecones aside until they are completely cool. 


Step two: 
Pick out the glitter colors you want to use for the project and sprinkle some of each color in its own plastic zip bag. Keep the tops sealed so you don't have glitter all over the table later. 


Step three:
Now that your glitter is ready it's time to add glue to your pinecones. Take your disposable tray and place the pinecone inside. Drizzle the pinecone with glue and then let your child "paint" on the glue with an old paint brush. Repeat this step until all your pinecones are covered generously in glue. 


Step four:
Shake it up! Take a pinecone and put it in a bag of glitter, seal the bag and let your little ones go to work shaking it up! Make sure the pinecone is covered all the way around with glitter before removing it from the bag. Set it aside and repeat this step until all your pinecones are covered in glitter. 


After all your glittery pinecones are complete let them sit overnight to dry. The next day your pinecones will be ready to go in a glass jar or bowl to add to your holiday decor. 
Tip: If you're like me and detest the sight of glitter on everything you can take a can of Mod Podge clear acrylic sealer and spray your pinecones down, once they dry the glitter is sealed in place. 


Want to mix it up? Take your finished pinecones and hot-glue ribbon to the bottom and then tie them together at the top to create a hanging bundle. Since my son picked out our glitter I stayed with a neutral ribbon color for ours but you can mix and match any way you want. Your bundle can also go bigger if you like. No matter what you decide it will be perfect and if you're having fun with your children you're doing it right. 


Wednesday, September 24, 2014

Painting with tape, an organized mess!

When finger painting with children you often think of abstract art. But what if you could let your children paint freely and still have an organized master piece to hang on the walls? Here are some fun and easy ideas for you to create "organized messes" with your little ones. 


To get started you'll need some supplies.
  • Blank canvas. You can find these at any craft store and size is up to you. 
  • Edging tape ( I'd pick a width that is not to skinny or wide for best results) 
  • Washable paint
  • Paint brushes (optional depending on how messy you want to get)
  • Disposable cups or plate


Step 1:
What would you like to create? Today I am playing with a Halloween themed idea but I will show you other options at the end of the blog. First you want to tape out any areas where you do NOT want paint. 


Step 2:
Grab the paint colors you'd like to use and put them in cups for dipping with a paint brush or onto a disposable/washable plate for finger painting as shown here by my adorable model. 


Step 3:
Let's get messy! Here's where you let your little one paint inside (or outside) the tape. Depending on what you're creating you can go with one color at a time or a whole palatte. 
 Tip: always keep a damp rag handy so if your little one paints outside the "lines" it can easily be wiped away. 


Step 4: 
Let it dry! It will take anywhere from 2-4 hours for all the paint to dry. When it's ready, remove all the edging tape so only your child's master piece remains. You can go back and add words or any other art you'd like to enhance their work, and ta-da you're done! 


If one idea isn't enough for you how about taping out an American flag? You just use star stickers in the box to get your white stars and edging tape to mark your white bars on the flag. 


You can tape out squares and let your little one create his own unique masterpiece. 


If you have more than one child tape out something special for each one, it can be initials, stripes, or shapes. 

Before:


After:


 Always be sure to mark on the back of your painting your child's name and the date, then you can hang them up for everyone to enjoy. These also make great gifts for grandparents any time of year. So please, go have fun and enjoy getting messy! 


Monday, September 15, 2014

Caterpillar on a Leaf


What better way to say goodbye to summer than creating your own little caterpillar to keep around? Follow the steps below to make this with your little ones.  You will love how simple and fun it can be.


Here's what you will need to get started.


  • One sheet of colored construction paper
  • One sheet of white construction paper
  • Washable finger paint
  • Glue stick
  • Tape
  • Scissors
  • A big leaf
  • Brown crayon with the paper removed


Step one:  Pick a leaf


Pick a leaf, any leaf! Part of the fun is letting each child pick their own leaf, especially if you have multiple children, each one will be unique. 


Step two: Leaf rubbing


While your leaf is face down cover it with your white sheet of paper and tape it down. This will keep it steady while your little ones are doing their rubbing. 


Next, lay your brown crayon sideways and rub. Make sure to apply enough pressure to the crayon so the outline of your leaf is clearly visable when you finish. After your rubbing is complete cut out your leaf and sit aside. If your children are old enough you can let them do this part with safety scissors. 


Step 3: Making the caterpillar

To make your caterpillar you'll want to sit your little one down and grab a wet rag. Take your washable paint (any color) and dab it on the bottom of each toe of one foot. 

Fold your white paper in half and press the paper to all five toes. Grab that wet rag and wipe off any excess paint. Set the paper aside until it dries. When your caterpillar is dry go ahead and draw your antennas, eyes, smile, and feet on the caterpillar, then cut it out. Let the kids get involved In this part. 


Step 4: Putting it all together

Grab your sheet of colored construction paper (any color) and let your little one glue their leaf to it. After the leaf is secured to the paper apply glue to your cut out caterpillar and attach it to the leaf. Congratulations you're finished! You have a little caterpillar on a leaf that will look perfect on anyone's refrigerator! 


I hope you enjoyed this project with your little ones! Next weeks craft will be on finger painting with canvases and tape. It will be loads of messy fun!